Packing within weight limitations.
Here is what we recommend to take along..
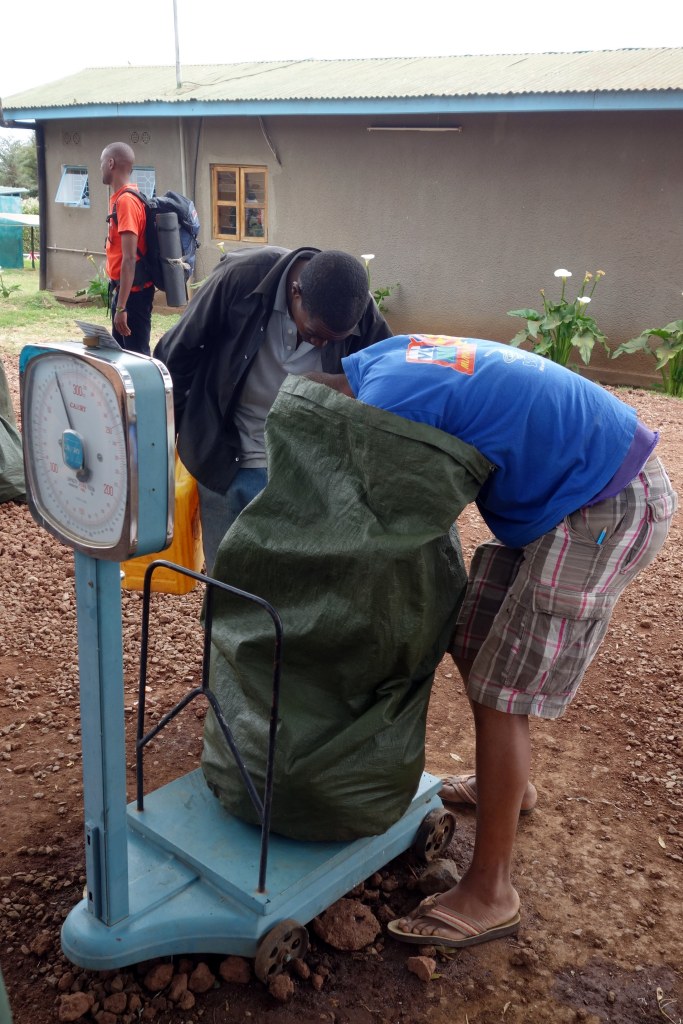
You will have 2 bags: duffel bag (normally with the porter) and your day pack.
There are weight limitations around how much the porters can carry in the duffel bags. This puts limitations on how much you can take along… cannot take multiple layers and shoes! However, an optimally packed duffel bag is important for a successful hike.
Also the porter will be hauling your duffel bag to the next stop, so you need to make sure that your day pack has essential supplies for the day.
Note one key thing for gear – you are able to rent most supplies there as well (your company should be able to bring that to you). However, if you want to get used to wearing certain gear, are a bit germophobic (like one of our friends who had issues sliding into used sleeping bags :)) or see yourself using that in future treks, you are better off buying than renting.
What bag should I carry?
An initial choice is between a duffel bag and a rucksack. From our experience, porters prefer duffel bags and also tend to be easier to search through when looking for something. Rucksack are good options on treks when you plan to carry the bag. Given that pretty much most folks will be using porters, we recommend duffel bags. On other treks such as the Appalachian trek or the W-trek in the Patagonia where you lug around your bags, rucksacks are the way to go.
The porters carry the duffels bags and take it to the next stop for the day. It’s amazing how the porters leave the prior night campground, carry their gazillion pounds, rush past you and the next campsite is set up when you get to it. We highly recommend getting a 90L waterproof (to prevent water seepage, even though porters may put them in their plastic bags) duffel bag. It’s important to get something sturdy and not cheap and will also be checking in for your flight.
We used the Northface BaseCamp Duffel L – it packs 95L, is very sturdy and has lasted us across multiple hikes. It is waterproof and comes in different colors – making it easy to spot at baggage claim (though the reds are becoming more popular and you might see a few a few of those smart looking bags).

And what about my Day Pack?
What should be in my Day Pack: Water (an essential requirement for life on Earth because it functions as a solvent.. 🙂 and about 3-4L of that in your hydration pack/bladder, lunch (if needed for the day and normally provided by your company), outer layers, rain protection, phone/camera (you want to capture those pristine mountain images as great memories), snack / granola bars (need those pick-me-up options accessible), medication (bandaids, tylenols, allergy meds, anti-diarrhea pills) are some key things to pack.
You want a DayPack that is inherently light, can house your hydration pack, has some easily accessible pockets so you don’t need to take it off when you want to get a quick snack, has straps that go around your chest/stomach distributing the weight and can hold up your hiking poles. Another option with the Day Pack is a day pack cover to keep the insides of your Day Pack dry.
There are some nice Osprey backpacks but there are some nice cheaper ones by Kailas as well. These are also useful to use as personal items on flights like Spirit & Ryan Air – so one doesn’t have to pay for Carry Ons! Make sure you practice hiking with your Day Pack carrying about 15 lbs worth of weight to get your body accustomed to it.

What to wear? Base layer / Middle layer / Shell – so many questions!
You need to break up what you need to wear into layers – base layers, middle layers (your insulating layers) and outer layers (shell layer). One need not wear all layers at the same time, but you want to have these options available in case the temperature drops (and which it will for the summit night).
You will also hear about light weight, mid weight & heavy weight. Heavy weights tend to thickest and warmest while light weight are at the other end of the spectrum. Light weights are recommended when the temperatures are not going to be that low or you expect to be active – while heavy weights are good for below freezing at times of less activity.
Base layers: Your base layers are your undergarments whose purpose is to wick the sweat away from your skin. You don’t want to have a cotton layer which doesn’t wick away sweat and you start feeling cold as a result. We recommend base layers made of polyester, nylon or merino wool.
For higher altitudes once it starts getting colder, we recommend a midweight polyester layer of long top and bottoms. These may not be not needed on warmer days but are a definite musts as you get to higher altitudes and especially on summit night.
At lower altitudes when it is not as cold, you can wear wicking T-shirts as well as your base/middle layer.
Middle layer: Your middle layer is your insulating layer. It can be the outer layer at times when you are at lower altitudes and hiking since it is not as cold. It can also the layer one uses at night when at camp sites. It helps to trap your body heat and keeps your nice and warm.
We highly recommend either a good polyester fleece material or down insulated jackets (fill power at least 600) for your middle layers. One call out: Fleece tends to keep you warm even when it gets damp while down loses its insulating properties when it gets warm. However, down tends to be more insulating than fleece. We had used both jackets depending on the day for our climb.
Amongst down filled jackets, we recommend going with known brands (you get the comfort of knowing you would be warm on the summit night) as well as lighter jackets (you will be carrying that in day packs or duffel when you don’t need it). Other considerations apart from price and at least a 600 down are a: hooded jacket, closer stitching to keep down in place & brighter colors for easier sighting. Few recommendations are: Cotopaxi jackets, Marmot jackets (albeit no hood), & Columbia jackets.
Outer layer (Shells): Materials like fleece tends to breathe well so you will not overheat. However, this also makes is susceptible for one feeling cold when there are strong winds. Also one needs rain protection for down jackets.
You can get breathable or nonbreathable shells. For a trek like Kili where you will be walking quite a bit and sweating as a result, we recommend getting breathable shells.
You can either get waterproof or water resistant shells. Waterproof tend to completely keep water our while water resistant are good for lighter rain.
And what about my feet – shoes & socks?
You need to make sure your most used appendage is well taken care of during the hike. We also recommend that this be one of the first purchases so that you can do all your practice hikes in these and get your feet well accustomed to its partner on your 7-10 days Kili trek.
You want to make sure that you have put more than at least 50 miles on your shoes so that they are broken into. Nothing worse than having a nice pair of new shoes that start pinching your foot on day 2 and you are dealing with blisters and moleskins for rest of the hike – that can make for one miserable climb.
Also we highly recommend that you travel to your destination with your shoes on – so for the worst case scenario where your luggage shows up late, you can always rent other things but don’t want to be hiking in shoes that your feet aren’t acquainted with!
Shoes:
Waterproof or Non-Waterproof?
A key choice is whether one should get waterproof shoes or non-waterproof shoes. Waterproof shoes normally have a layer of materials like Gore-Tex under the outer layer to prevent water from seeping in. Since they keep air out, they also do a great job of keeping the cold air out. However, one downside of waterproof shoes is that they will not breathe well and it will keep water from getting out (all the sweat from your feet has nowhere to go). However, Gore-Tex is somewhat breathable and does allow some water vapor to go from inside out. Gore-Tex generally works fine when you are climbing in colder areas (and hence sweating less) but this can be a challenge when hiking in hot/humid conditions. It is also a great choice if you expect to cross a lot of streams with very low water levels.
Non-waterproof shoes/boots tend to breathe much better, however, breathability means that water can seep in. Given they allow sweat to be taken away, they are better options in warmer hikes.
However, waterproof shoes in general will cost and weight more than their non-waterproof brothers given the additional Gore-Tex layer in between.
Given that Kili entails climbing in colder temperatures (especially on the summit night), we recommend getting waterproof shoes. Some folks carry breathable shoes and use that for the first few days of the climb (assuming weight allows for it).
Boots or shoes?
Another decision you have to make is whether you select a pair of hiking boots or hiking shoes. Hiking boots tend to be durable, offer more ankle protection but run heavier than hiking shoes. You will be taking a gazillion steps on your hike and heavier shoes imply carrying more weight and will tire you out faster.
If you tend to normally twist your ankle during your regular hikes/walks, then hiking boots may be the way to go. Some good hiking boot options are: Men (Salomon Quest 4D II GTX Hiking Boots) or Women (La Sportiva Nucleo High II GTX Hiking Boots – Women’s).
However, if that is not a concern for you, we recommend good mid hiking boots to keep lesser weight on your feet and that incremental ankle support from boots may not be worth it. Some good proven hiking shoe options are: Men (Salomon Men’s X Ultra 4 Mid Gore-tex Hiking Boots) or Women (Salomon Women’s X Ultra 4 Mid Gore-Tex).
Shoe Size, Gators & Socks
For hiking shoes/boots, also be mindful of what size shoes you get. Since one needs to double layer socks on summit night, some people prefer getting half a size up. It also does a good job of giving some room for your feet as they tend to swell up a bit. However, if the shoe size ends up running quite over, one has the risk of toe getting stubbed especially as you descend through the scree.
Gators are also recommended to take along – since they help to keep the small rocks and dust out as well as enable water to slide away from entering through your sock into a shoe in case of rain. There are different sized gators and we recommend the mid-calf ones for the hike.
For socks, we recommend getting liner socks and woolen/thermal socks on the outside. Liner socks are good to help wick your sweat away and help with reducing likelihood of blisters. Just no cotton liners – but wicking material liners. (Liner option: Fox River Men’s Wick Dry Altura Crew Sock Liner). As for regular socks, woolen sock are definitely recommended. One can use mid-weight socks for first few days and then then heavy-weight ones (or 2) at least for summit night. Here is a good sock option (Alvada Merino Wool Hiking Socks Thermal Warm Crew Winter Boot Sock).
And what is the sleeping situation?
Hiking Kili, unlike hiking EBC where you stay in tea-houses, you have to sleep in tents. This along with the cold temperatures at nights (and snoring situation from your co-campers at times) makes sleeping a hard activity. Someone said it somewhere: Hiking in Kili, you eat like a king, walk like a prince and sleep like a pauper.
You want to give yourself the best odds given this situation. Some key recommendations for sleeping are:
- Sleeping pad: This helps to give some cushion if the ground underneath is uneven. It also provides an insulation layer. You can either take this or we recommend renting it from your travel company.
- Sleeping bag: A well rated sleeping bag is important. It’s one thing you don’t want to skimp on. However, you don’t need to go too much over the top since we recommend a sleeping liner along with the sleeping bag. So when the temperatures are relatively warmer on the first few days, you can use the bag without the liner while using the liner and the bag as you get closer to the summit night. At the same time, you want something light – since all weight count towards the weight limit that porters can carry. If you don’t plan to use a sleeping bag again (no future hikes or camping trips), then one can always rent a sleeping bag. But we recommend taking along one’s liner – so you don’t have to worry about the hygiene of the bag. We recommend at least a 20 F mummy sleeping bag that is ideally filled with down making it light and compact. Some recommendations: Women and Men. Light weight sleeping liner recommendations is the one by Sea-to-Summit.
